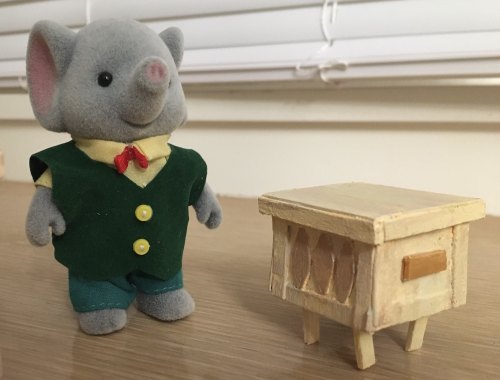
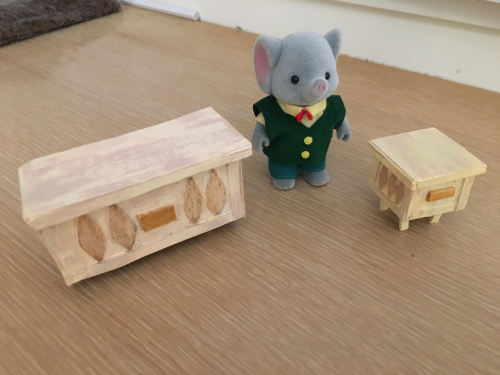
I made an end table to show the process I use for making my mini calico critter furniture! :^) It&rs
I made an end table to show the process I use for making my mini calico critter furniture! :^) It’s a set to go with the credenza I made a little while ago!Process under the cut! Give it a shot, its not too hard at all, I promise! I didn’t use a pattern, but if you would like to make one for the pieces, give me a hollar! :^DWhat you’ll need:Chipboard (thin cardboard used for cereal and dry food boxes)Cardboard (For this small furniture, I use cardboard with the small teeth inside (on the left in the image below) versus the more sturdy standard cardboard. It is just what I had laying around, but you can use either!GlueAcrylic paintPopsicle sticks (standard size)First: Size and cut your piecesI used a official side table for scale, this piece is simple so there is no storage on it however. You’ll need 3 sets of 2 sides (front/back, left/right, top/bottom). Do the top and bottom last. The front/back and sides can be whatever width you would like (as long as you have two pairs they will match up) I made mine ~1.2 inch wide and 1 inch high. Make sure the front/back and left/right are the same height though. (I stack them to compare pieces and trim the excess.) You want all of them to be a little shorter than your final overall desire, so you have room to add legs.Find the size of the top/bottom by lining up the front and a side, standing them up so they meet at a 90 degree angle. Trace around the half of a square they make onto the cardboard you are using, then move and flip the pieces to finish the other side by lining up their ends with the ends of the lines you made previously. Cut the second top/bottom by using the piece you just cut as a guide.Glue either pair of sides onto the flat part of a top/bottom piece. Because my cardboard is thin, it does not stand up on its own, so I lean it as straight up as possible against two objects. When they dry (be patient depending on your glue), glue your other side pair to the edges of the U shape you have created. Do not try to wedge them in between or you risk bending the cardboard. Once all of your four sides are dry and connected, top them off with your final piece. It should look like the next image.Somewhere along the line I measured wrong. Any visible gaps or edges will be hidden however, so if you have any, don’t worry. :^) Next you will need your chipboard and popsicle sticks. Cut long strips of chipboard (about 1/8th of an inch, I think). Then, measuring them against your box, cut 4 for the width of your side pieces, 4 for the height. Repeat for back and front. Glue the pieces measured to your width first, so you have one at the top, and one at the bottom of each side. Then layer the pieces measured to your height over top of them, so that all of the edges of your chipboard are as close to the edges of your cardboard sides as possible. This should cover any exposed edges.Next, prep your popsicle sticks. Cut the rounded ends off, then split the popsicle down the middle so you have two long halves. Cut each half in two. Trim to size to line the boarder of the top side of your box, like the image below. There will probably be gaps between the popsicle sticks and the box. Don’t worry. But your popsicle sticks should overlap/touch each other, however. I always cut them a little longer than I need, and then little by little trim them down to fit.Next you will need to make a tabletop. Take your chipboard, place your box on top, and trace an outline. Cut on the inside of the line you made. It should be slightly smaller than boarder at the top of your box. Test it by placing it on top, if it is too big, gently trim the edges until it fits like the image below.Once you are satisfied, glue it down. While the glue is drying, get ready to cut your side designs into chipboard. You can make them whatever you like, hearts, diamonds (kinda what I did) or butterflies… You name it, its up to you. Just make your design small enough to fit within the boarders of chipboard you made on your sides (you may need to hold it up to the table a few times to eyeball if it is the right size). Trace around the design you like onto the chipboard to cut identical pieces for the other sides. Once you are happy, glue the pieces in.Still have gaps in your cardboard and/or chipboard? Fill with thin strips of glue, squirted into the cracks. When this dries it will fill them in, and give an even, blocked surface to paint over. Keep layering until it is full to your liking.Next, you will need your popsicle sticks again. Cut the ends, split them down the middle again. 4 short sticks, a little longer than a sprinkle. Use the first one cut, to measure the size of the others by holding it up to the stick and marking the end point.Glue these to the bottom side of your table using the strongest glue you have. If you dab the glue on the bottom, you should be able to stand them up in the liquid- but if they try to fall over or lean, you can prop them up with scraps (lean them so they are not touching the glue)Wait for everything to dry. Like completely dry. I mean it, or when you begin the next step, stuff is going to slide around and fall off.Paint everything in a thick coat of white. Make sure your brush strokes on each side follow the same direction. Still got cracks? Fill them with globs of paint on a small brush. Really stuff it in there– then gently brush over the whole side’s surface to remove any excess that has strayed from the cracksI do two thick coats of white. Don’t forget the legs. Once your base layers have dried, you can pick your wood color. I decided on a birch color, so I used a lot of white and yellow, a bit of red, and the smallest dab of blue to mute the color to a more natural tone. You don’t want to just use red and yellow, because even a deep orange runs the risk of looking too saturated and unnatural.Time for the details. To make a wood texture, mix a color a few shades darker than your wood tone. I added a bit more red to mine to give it a gentle, peach cast. Load your paint brush, and rub the excess paint into your pallet. Dry brush the remaining paint in your bristles sparingly across the surfaces of your sides in light strokes. The streakier the better. You are trying to create fake wood grain.While that is drying, take one of the scraps of your popsicle sticks (one of the thin, half-strips) and cut off one more “sprinkle”. This is your drawer handle. You can either glue this on, let it dry, then paint it– OR you can paint it, let it dry, then glue it. Up to you. I painted mine gold.Lastly, using a color 2-3 shades darker than your darkest wood tone, carefully paint the side details you cut out of chipboard. This color should be slightly more saturated than the wood grain. For a more weathered look, after applying the paint, scrub at with a paper towel- this should lift some of the paint and leave a more natural, worn appearance. (Make sure you’re using a clean spot on your cloth each time you scrub at a new detail)By the end, you should have something like this! You can change the size of the sides to make buffets, dressers, cabinets, you name it. When in doubt sizing, place a stand in calico critter nearby, and trim little by little while comparing!I hope this helped! I would love to see if anyone can use this tutorial to make some goodies of their own! If you have any questions, feel free to send me a message! Have a lovely day!–@cozy-possum @shiloh-sylvanian Hope its ok I tagged u both since you said you would like to see how I made the credenza! ;v;/ I loved hearing about your Grandma’s similar one in green Shiloh! That sounds so pretty! -- source link
Tumblr Blog : lollipoptiger.tumblr.com
#calico critters#sylvanian families#doll furniture#custom furniture#custom#tutorial#art tutorial#minitures

